Made by Pe Themes
First of all, Thank you so much for purchasing this template and for being our customer. You are awesome!
You are entitled to get free lifetime updates to this product + exceptional support from the author directly.
This documentation is to help you regarding each step of customization.
Please go through the documentation carefully to understand how this template is made and how to edit this properly.
When you purchase Nayla from Themeforest, you need to login your account and download theme files from Themeforest. Please make sure you downloaded All file & Documentation option.
After you downloaded theme files you will find inside it;
01. Demo Content - Contains exported .xml files
02. Documentation - Contains Nayla theme documentation
03. nayla.zip - Theme file for WordPress installation, if you want to install your theme manually (with FTP) you must unzip this file.
04. nayla-child.zip - Child Theme file for WordPress installation, if you want to install your theme manually (with FTP) you must unzip this file.
There's two way for install themes on WordPress, you can select which one is good for you.
Theme Installation via WordPress Admin;
Step 1: Login your WordPress admin dashboard
Step 2: Navigate to Appearance > Themes
Step 3: Click on Upload Theme
Step 4: Click on chose file, select "nayla.zip" and click Install Now.
Step 5: After upload is finished, click on Nayla to Activate
Theme Installation Manual (via FTP);
Step 1: Login to your hosting server via FTP client.
Step 2: Go to the folder /wp-content/themes
Step 3: Upload "nayla.zip" extracted content
Step 4: Login your WordPress admin dashboard Upload Theme
Step 5: Navigate to Appearance > Themes
Step 6: Click on Nayla to Activate
After you install and activate Nayla, you need to setup some couple of things to use it best condition. Please follow these documentation.
Every theme needs some plug-ins and with Nayla, you can install necessary plugins with only one click. Please follow these steps below;
Step 1: After you activate Nayla, you will see a sub-menu named "İnstall Plugins" inside of Appearance menu.
Step 2: Click on İnstall Plugins
Step 3: Install and activate all plug-ins
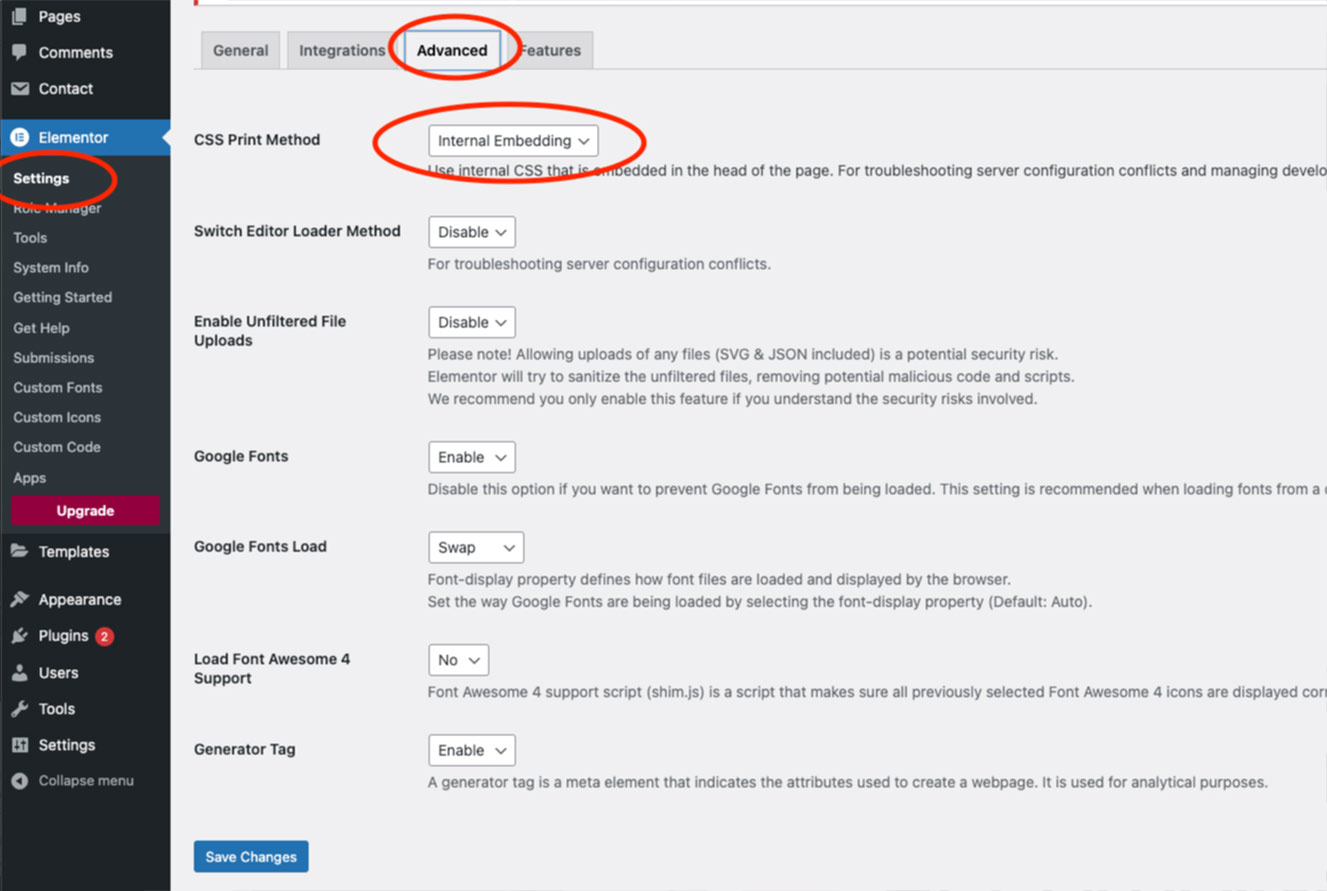
If you'll going to use AJAX page transitions on your website. Please make sure Elementor CSS print method setted to "Internal Embeding".
1- Navigate "Elementor > Settings > Advanced" tab in your WordPress admin dashbard.
2- Change the "CSS Print method" selection to "Internal Embedding."
Before start using Nayla, you need to activate your copy with the purchase code provided by ThemeForest.
Please follow these steps blow to get your purcahse code;
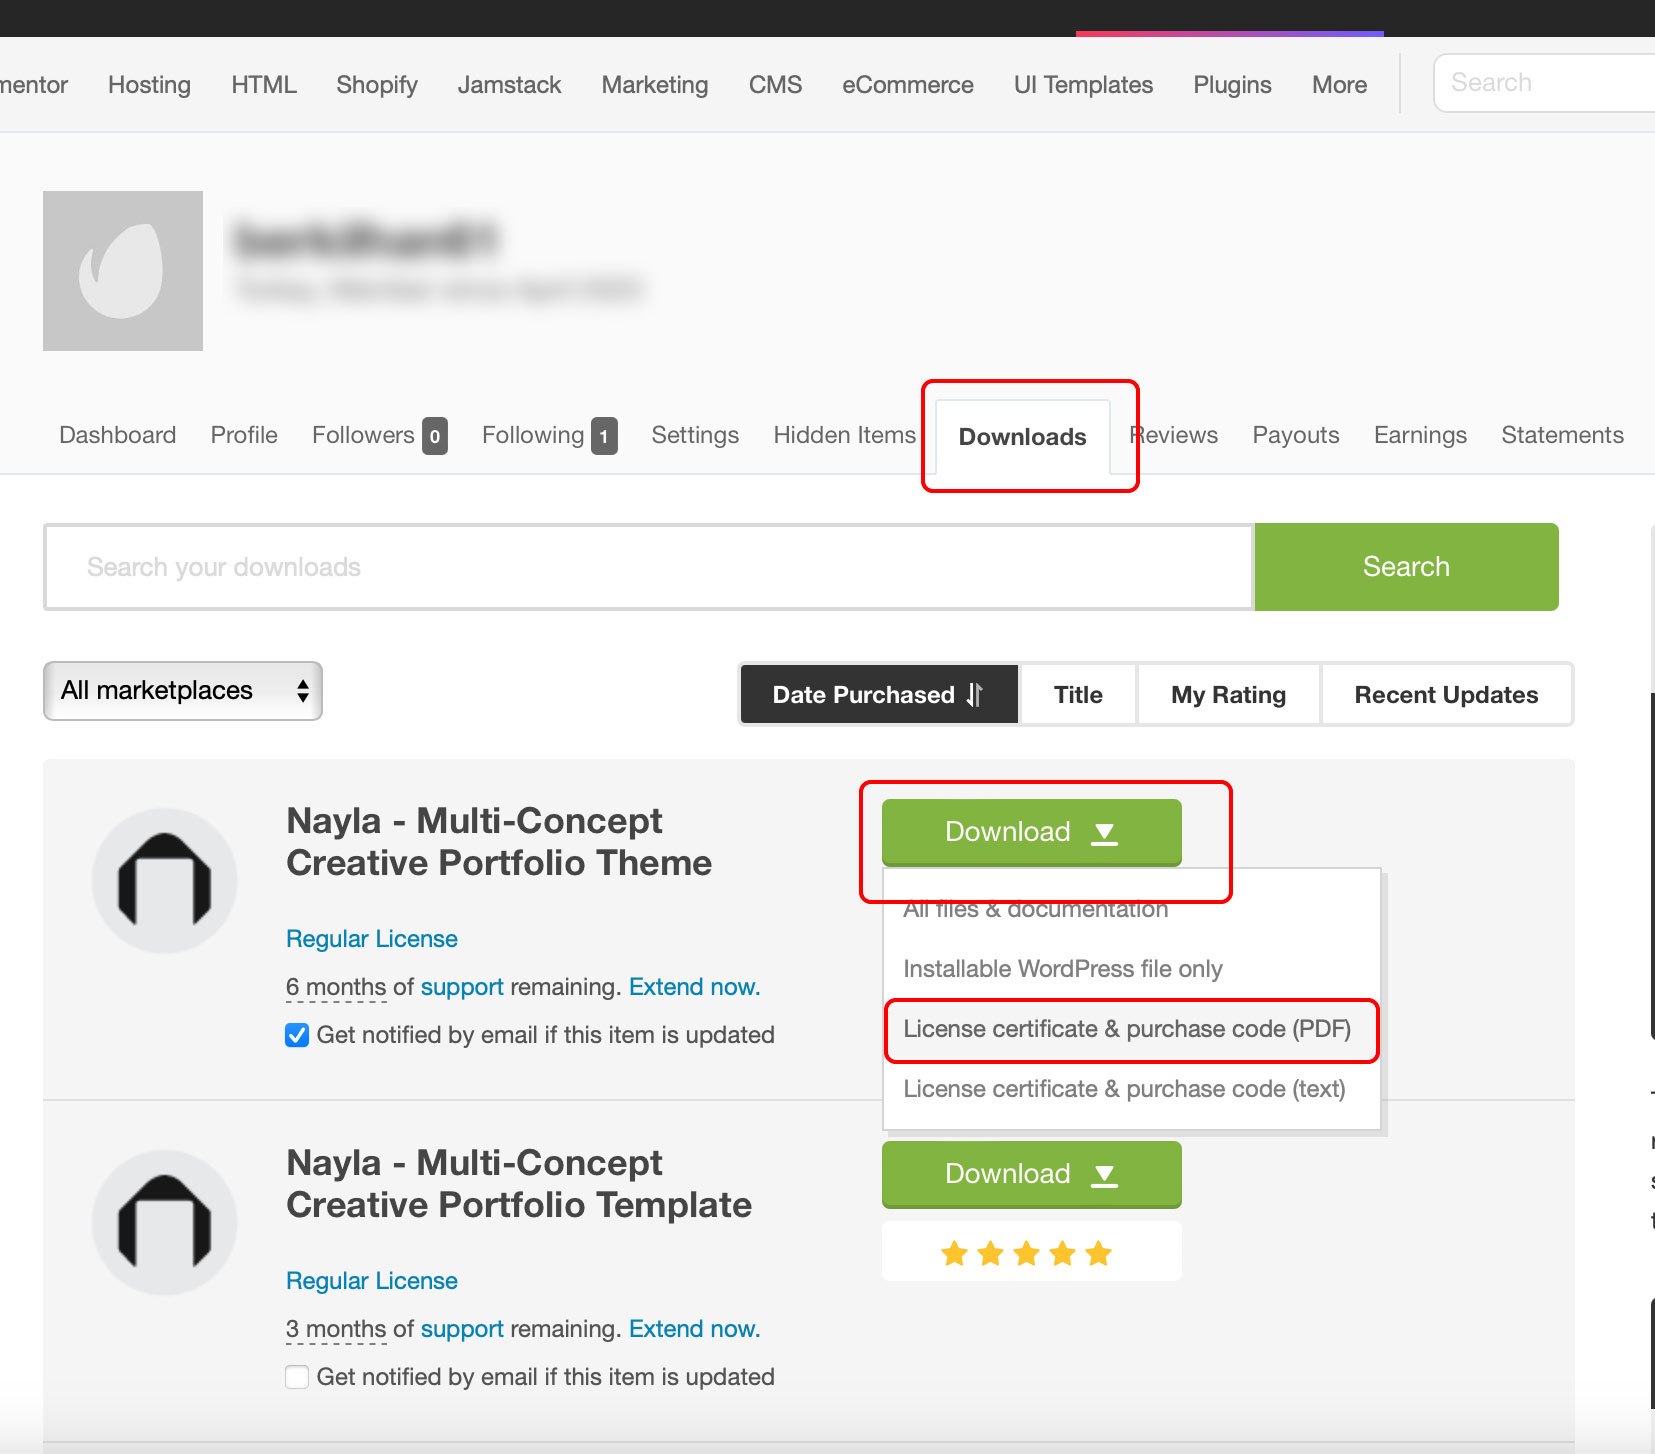
Step 1: Go to your ThemeForest profile and click on "Downloads" tab you'll see the items you purchased. Find Nayla and click on "Download" in the dropdown menu click on "License certificate & purchase code (PDF)"
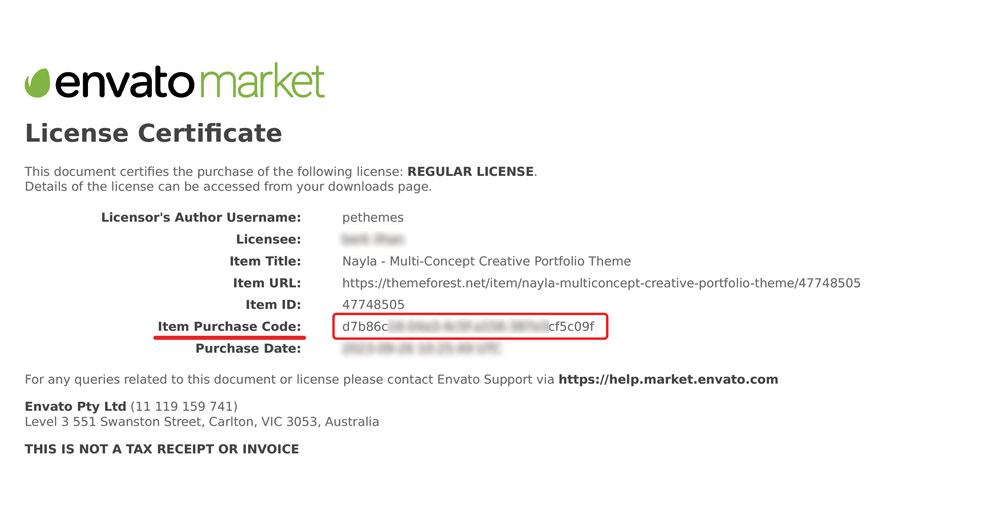
Step 2: You'll see your purchase information in the PDF file you downloaded. Copy "Item Purchase Code" value.
Step 3: Navigate Theme Options on your admin dashboard. You'll see theme activation section at top of the page. Paste your purchase code and click on "Activate".
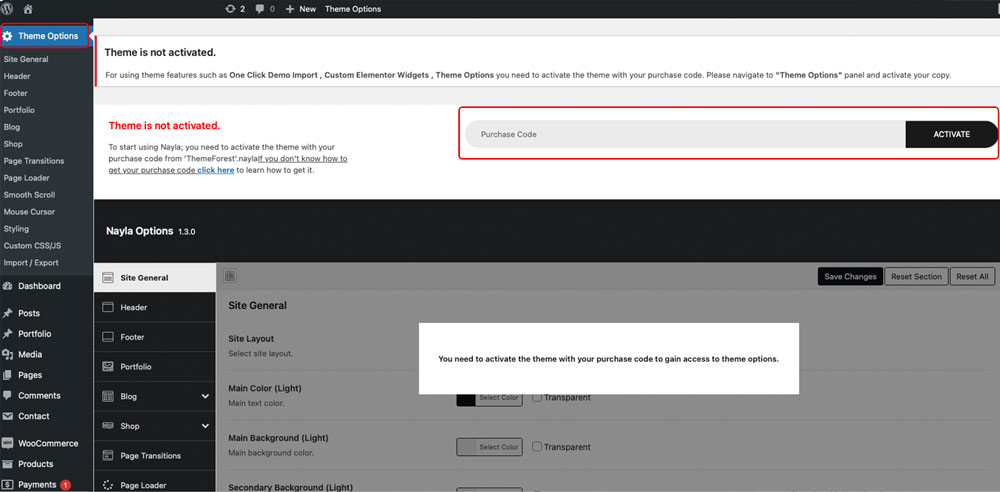
Without activating the theme; you can not access to "Theme Options , One Click Demo Import and Custom Elementor widgets". So before moving to demo import step you must activate your copy first.
Nayla demo content can be install with two ways;
If you want to install demo content automatically with one click demo importer which is strongly recommended by us, please follow these steps below;
Step 1: After you activate the theme and install plugins, there'll be a submenu ("Import Demo Data") appears below "Appearance" menu on WordPress Admin Dashboard click on it.
Step 2: Click on the button.
Step 3: Just wait a couple of minutes and everything will be done.
After the installation is done all pages, portfolios. posts will be imported correctly, menus and pages will be setted.
The images and videos you see on the demo website are not included in your purchase through Envato; they are copyrighted images and videos used for demonstration purposes with permission from their respective owners. Therefore, when the demo installation is completed, these images and vıdeos will not be uploaded to your website.
If you want to install demo content manualy please follow these steps below;
After you download theme files you will see a folder named "Demo Content", this folder contains an .xml file "nayla.xml" , to install demo content follow these steps:
Step 1: Navigate Tools > Import in your WordPress admin dashboard.
Step 2: Click on WordPress > Install Now
Step 3: After plugin installation complete click on Run Importer
Step 4: Click on Choose File and choose .xml file you want to import.
Step 5: Click on Choose File and choose nayla.xml file.
Step 6: Click on Upload file and import.
IMPORTANT NOTICE: Images and videos in demo website are not included with your purchase from ThemeForest, there are just for demo website. So after you install demo content images and videos will not be there.
After you install .xml file you still need to do some couple of things please continue follow these guide.
If you install demo content with one click demo import method this setting will be done automatically.
After you install ml you need to setup navigation menu. Follow these very easy steps below:
Step 1: Navigate Appearance > Menus in your WordPress admin dashboard
Step 2: You will see a menu named Main Menu created
Step 3: Scroll to bottom of the page
Step 4: Click Primary Menu checkbox
Step 5: Click on Save Menu
If you install demo content with one click demo import method this setting will be done automatically.
After you install demo .xml you need to setup home page. Follow these very easy steps below:
Step 1: Navigate Settings > Reading in your WordPress admin dashboard
Step 2: There is two variation for homepage display.
Step 3: Click on A static page(select below) checkbox, and select an home page.
Step 4: Select Blog in Posts page select menu.
Step 5: Click on Save Changes.
After you activate theme and install plugins there'll be a new menu item appears ("Theme Options") on WordPress Admin Dashboard.
You can find all theme settings here let's take a look whats in it;
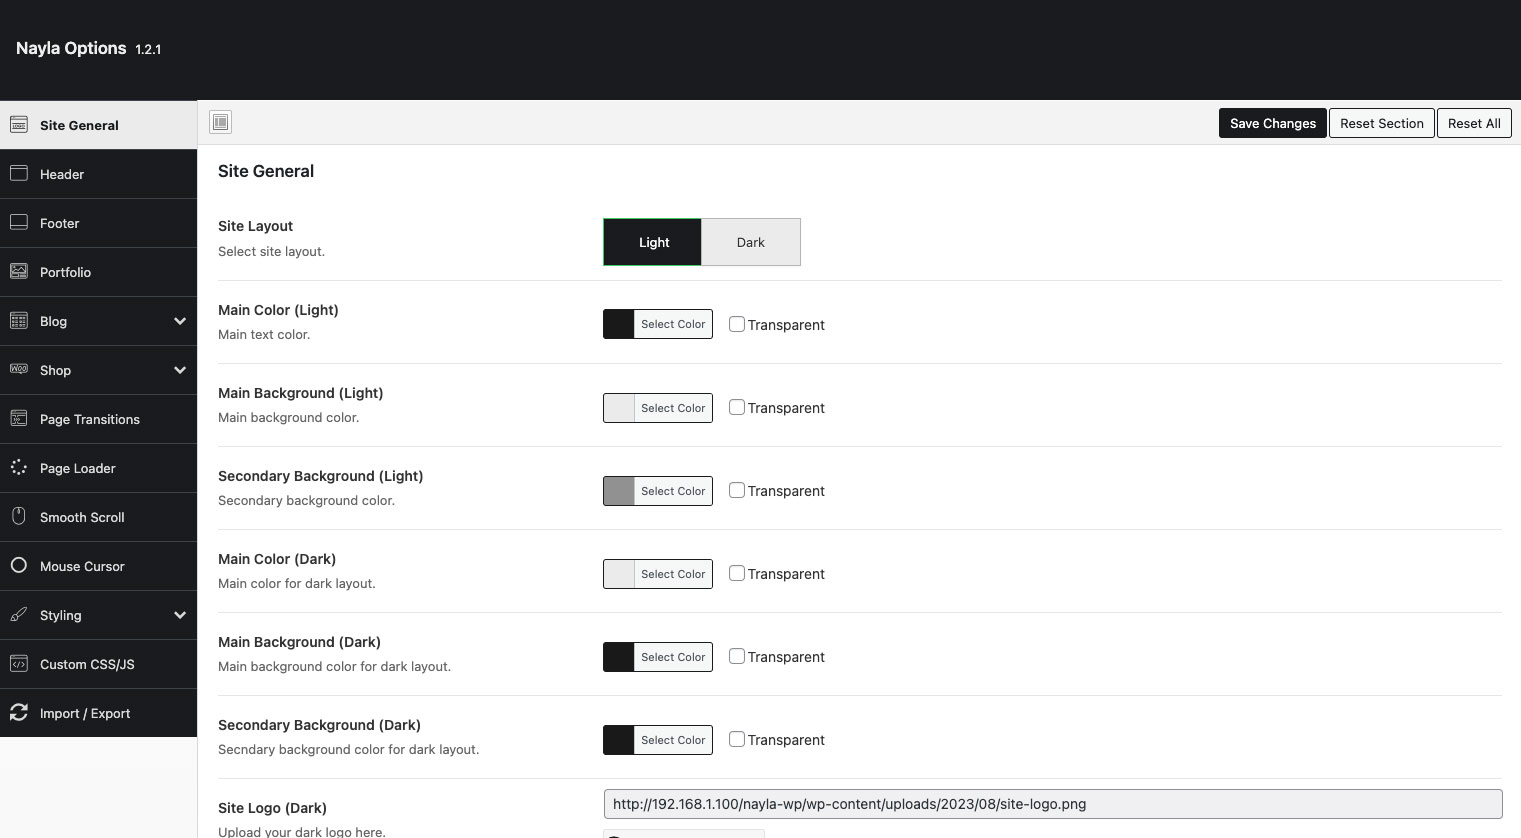
Site General: Allows you to select layout of the entire website and set the colors you want, also you can install your logos here.
Header: Set header settings here.
Footer: Allows you to set footer settings.
Portfolio: You can set global portfolio settings here, also you can set the global single portfolio page options here.
Blog: Global blog archive and single post options.
Shop: Set global shop archive and single product options here.
Page Transitions: Enable/disable page transitions and custimize them.
Page Loader: Same as page loader; enable/disable 'page loader' and custimize them.
Smooth Scroll: Allows you to set smooth scroll on/off on entire website.
Mouse Cursor: Customize mouse cursor here.
Nayla allows you to choose custom settings for each page, offering the possibility to customize many global theme settings for the pages, from header templates to page transitions.
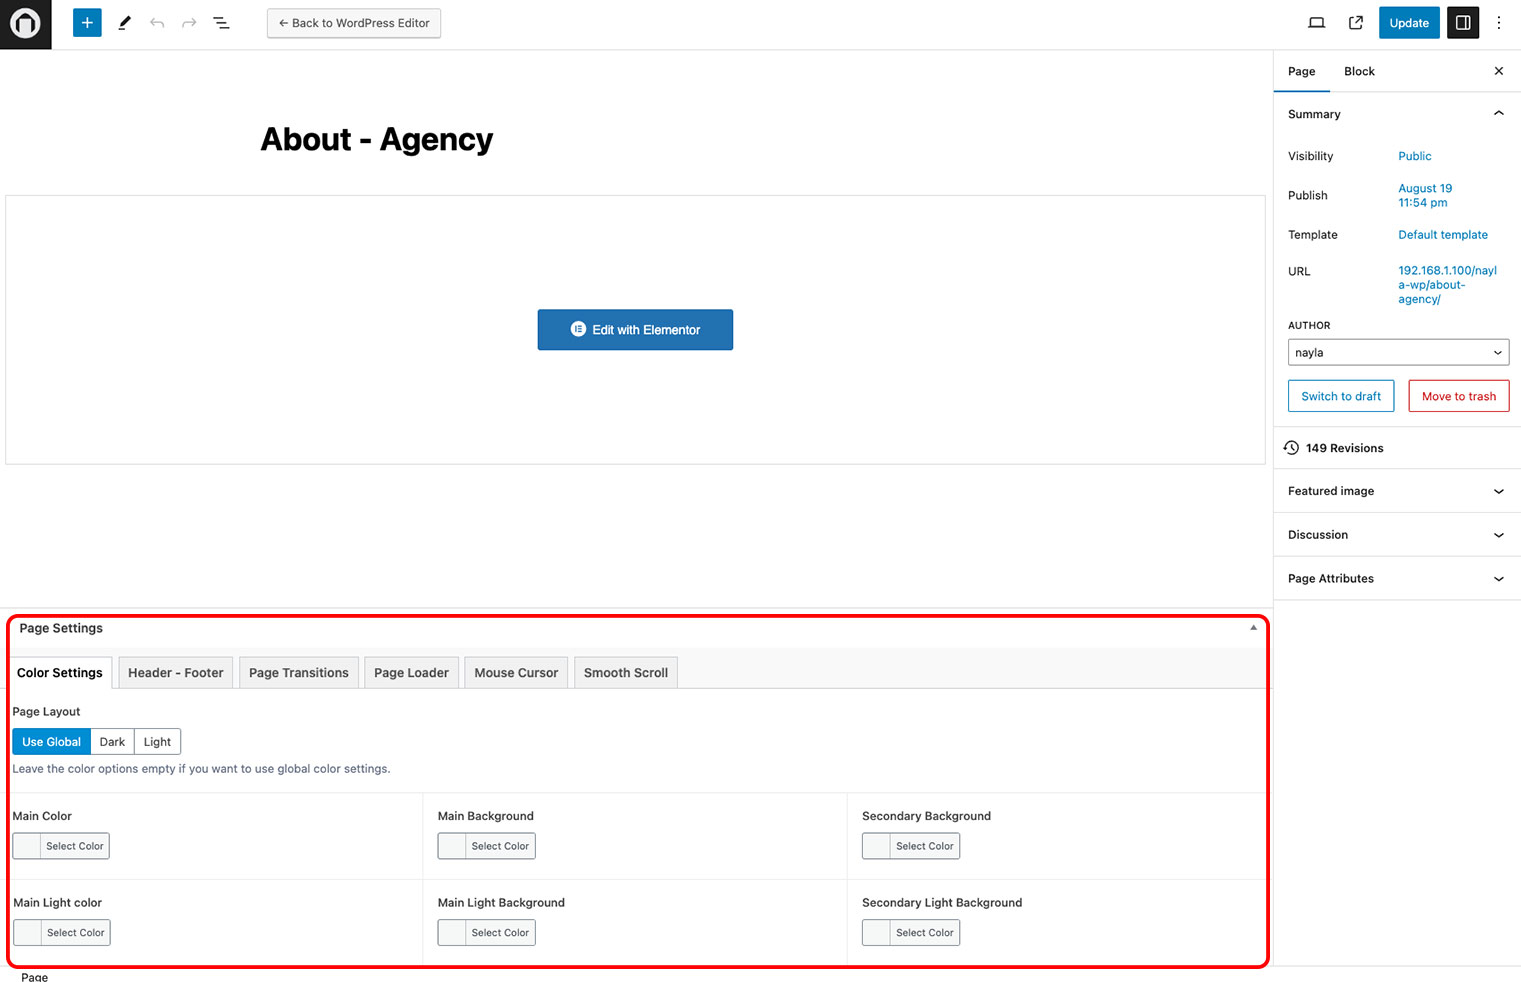
Color Settings: Set the colors for the page only.
Header - Footer: You can specify header and footer settings here, you can also select specific header/footer templates for this page
Page Transitions: Customize page transitions animations for this page.
Page Loader: You can change page loader animations/types for this page.
Mouse Cursor: You can customize mouse cursor settings for this page here.
Smooth Scroll: Set smooth scroll options for this page and enable/disable it.
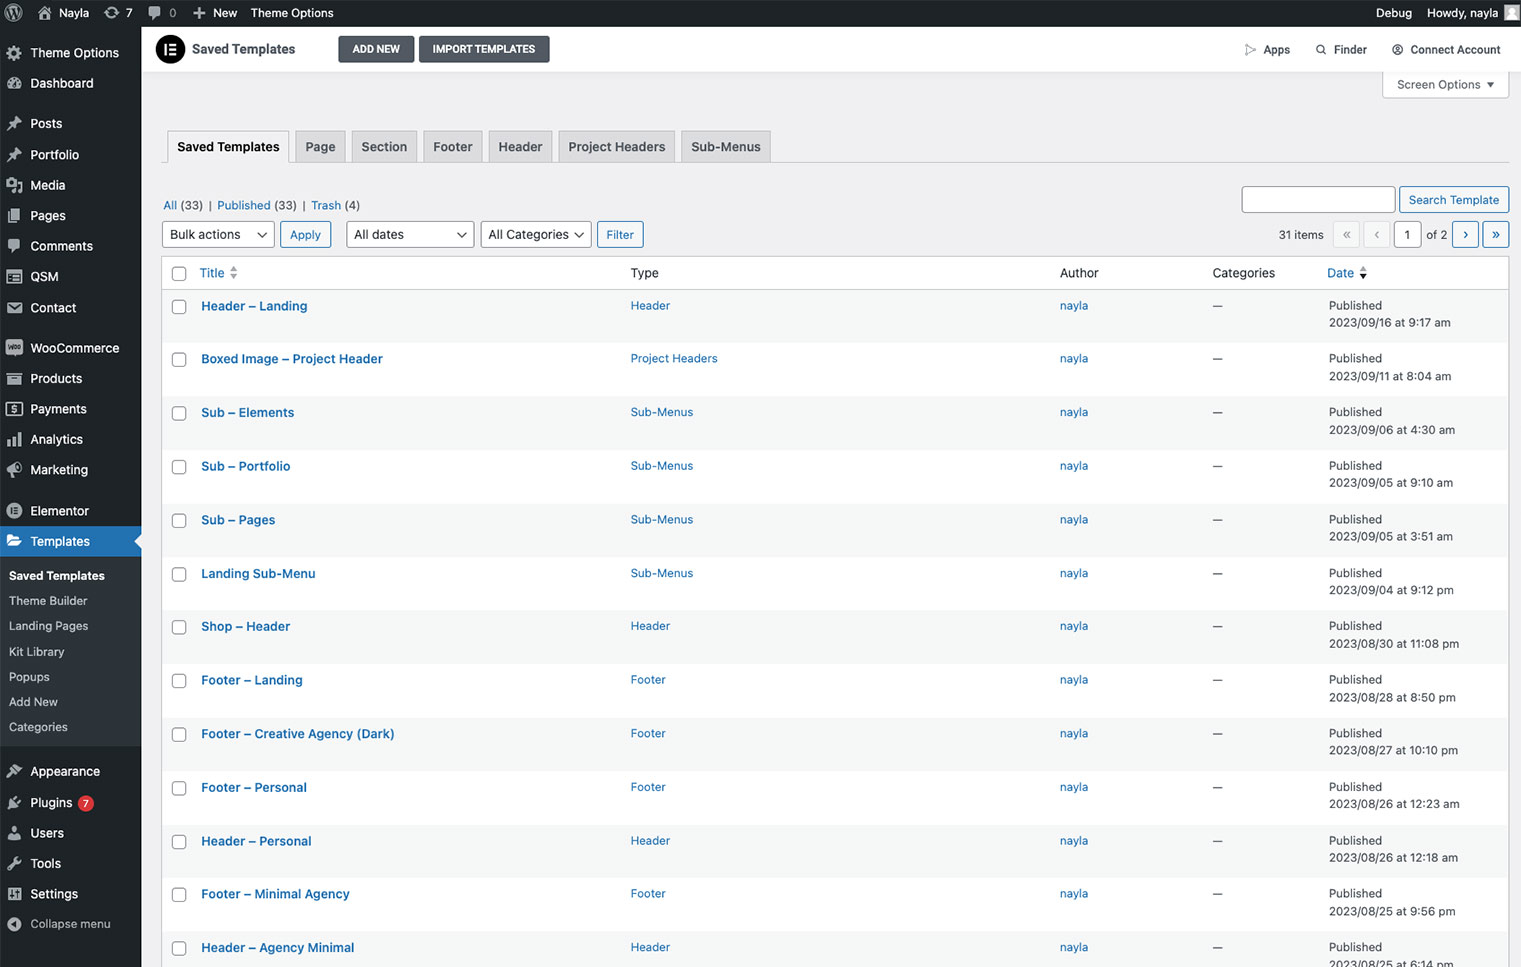
Elementor templates significantly streamline your workflow and offer extensive flexibility in utilizing the Nayla theme while building websites. You have the creative freedom to craft a diverse array of sections, ranging from captivating headers and footers to unique project headers and elegant sub-menus.
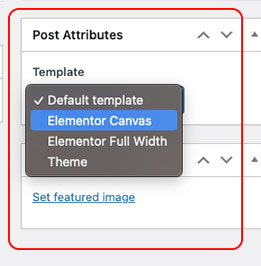
When creating templates, there's an important aspect to pay attention to. The template page structure should be set as 'Elementor Canvas.
Please follow these steps:
1- Navigate to 'Templates -> Saved Templates' in your WordPress Dashboard.
2- Hover over the chosen template and click on the 'Edit' button.
3- In the page settings, select 'Elementor Canvas' as the template under the 'Post Attributes' box on the right panel."
Header Templates: Once you create your header template here, you can choose to activate this template globally across the entire site through global theme settings. Alternatively, you can activate the header you've created for a specific page by going to that page's settings. For tips on creating header templates with Elementor, click here.
Footer Templates: Similar to headers, you can create footers and use them either across the entire site or on a page-by-page basis.
Project Header Templates: In this template type, you can customize existing pre-designed project page header templates to suit your needs. You can even create new project header templates and use them for your desired projects. For tips on creating project header templates with Elementor, click here.
Sub-Menu Templates: In this template type, you can design sub-menu layouts that can be used in classic menus."
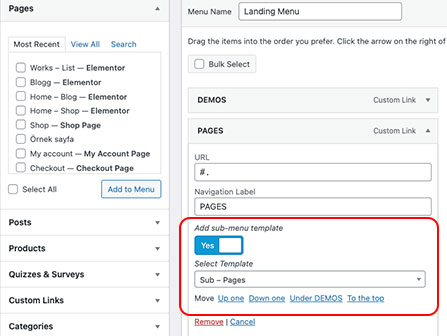
When creating pages with Nayla, you utilize the Elementor Page Builder. In addition to what Elementor offers during page creation, you can make your websites unique and more creative using Nayla's special page builder elements.
You can find more information about Elementor and it's widgets here.
To start creating pages with elementor please follow these steps below;
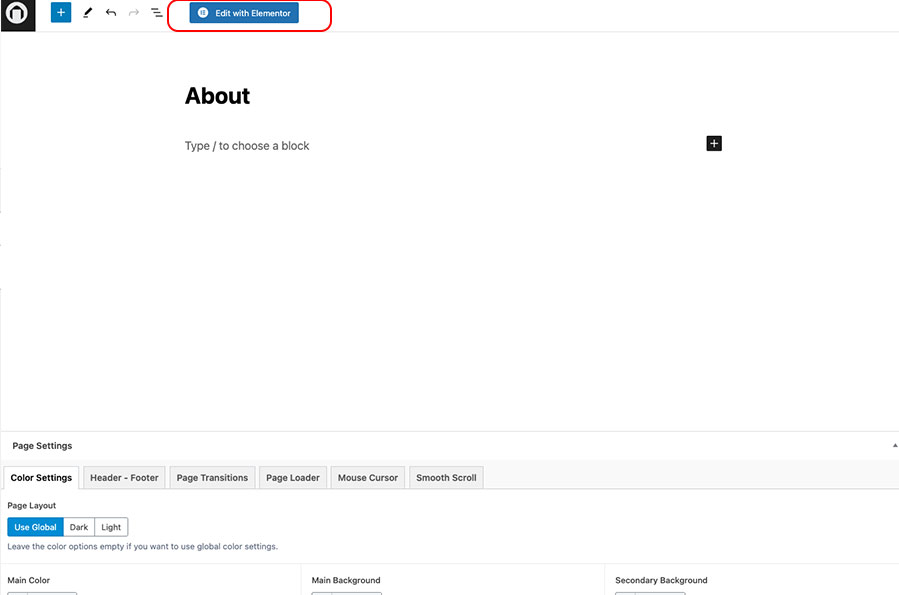
1- Navigate "Pages -> Add New" on your WordPress dashboard.
2- Click on "Edit with Elementor" on top of the screen.
3- You'll be ready to create wonderfull pages with Elementor editor.
When building pages with Elementor & Nayla, you'll see some special options/widgets that offered by Nayla. Let's take a look at these special features you will be able to use.
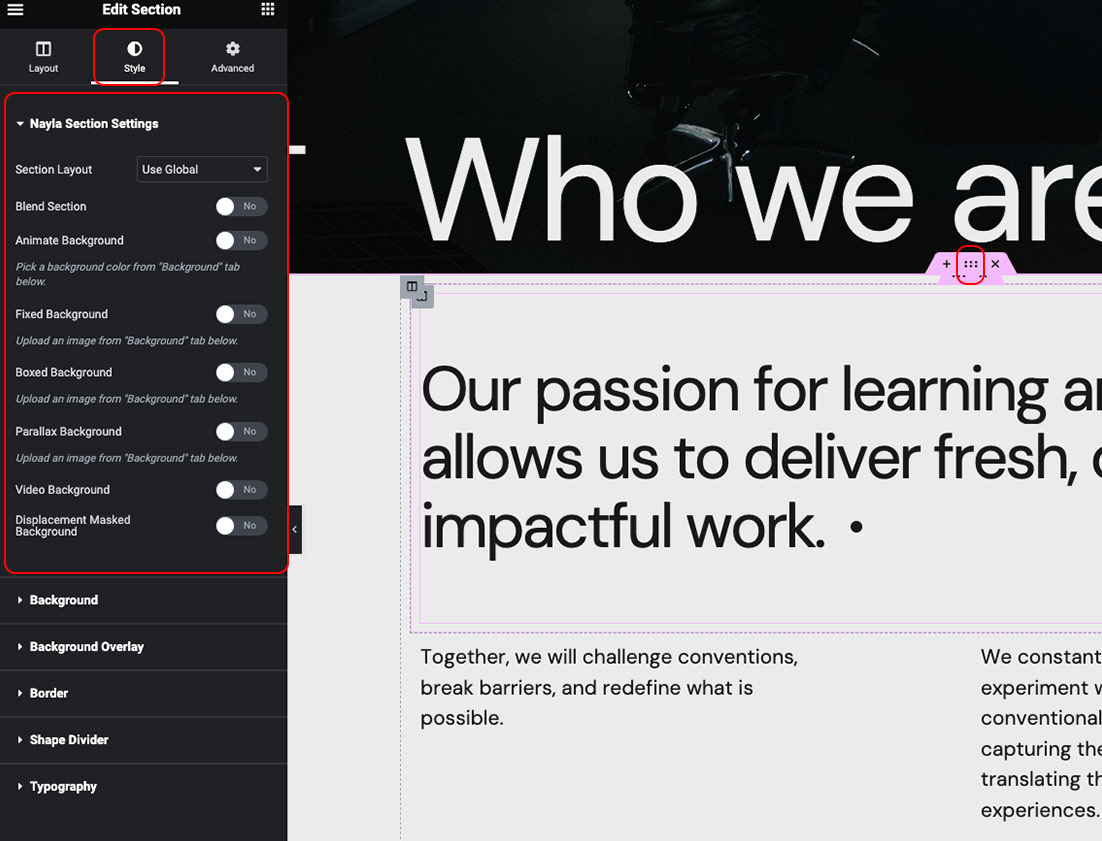
The first step in creating a page is to add sections to the page. After adding the sections, you will see some new section settings that come with Nayla in the respective section's settings panel.
With these settings, you gain more control over the sections, allowing you to enhance the appearance of your page, making it more beautiful.
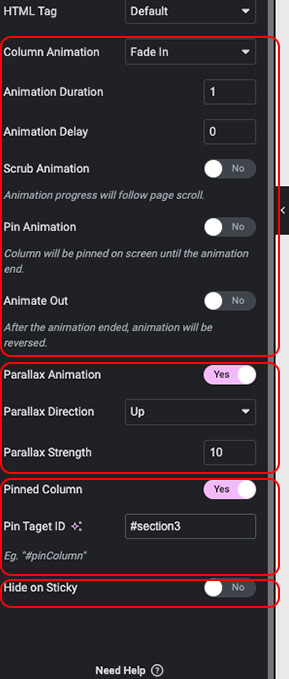
Just like in sections, Nayla offers specific settings within Elementor Columns. You can find these settings under the 'Layout' tab in the column settings panel.
Let's take a closer look at these settings:
1 - Column Animation: It includes special column animations that come with Nayla. With these animations, you can choose the animation that will play when the column enters the viewport.
2- Parallax Animation: Here, you can determine the parallax behavior the column will display while scrolling the page. You can set the direction, strength, and start and end positions of the behavior.
3 - Pinned Column: If you change this setting to "yes," it means the column will be pinned to another page element while scrolling. The column will stay fixed on the page as long as the pinned element is in the viewport.
When you change the setting to "yes," the panel will ask you to enter a pin target (ID is recommended). Once you input the target pin, everything is set for this column to be pinned to the target!
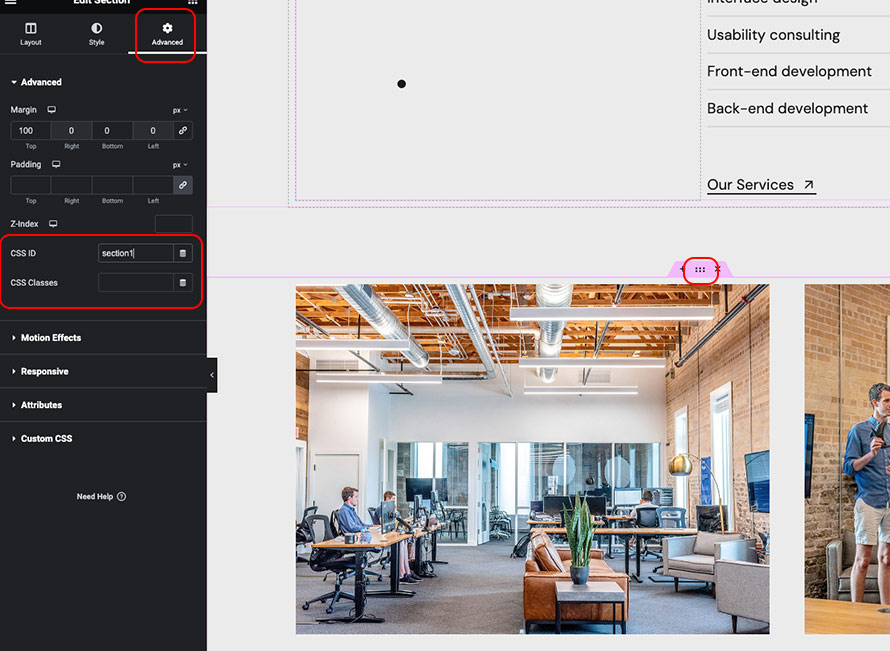
You can set CSS ID's and classes to a section from it's "Advanced" tab on the settings panel.
4 - Hide on Sticky: This setting does not affect anything in inner page columns. It only determines whether the columns in header sections will be visible when the header becomes sticky or fixed."
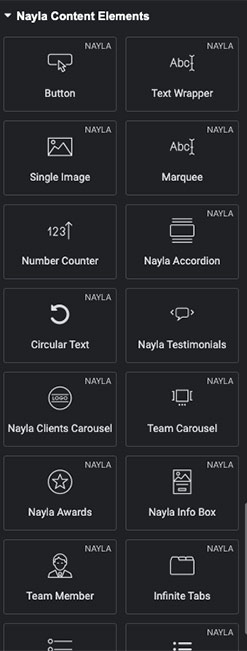
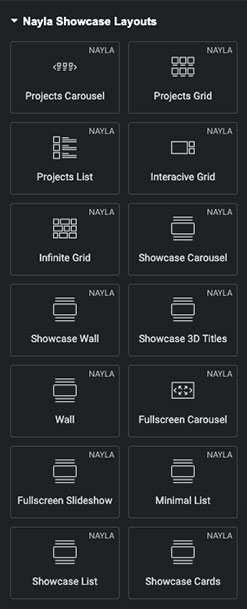
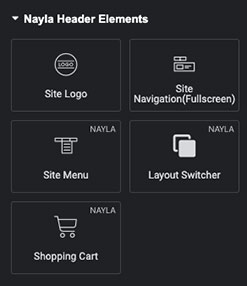
In addition to Elementor's default widgets, Nayla offers a wide range of new page builder widgets. These widgets are categorized into four distinct categories.
Let's take a closer look at these categorıes:
1 - Content Widgets
Content widgets are designed to be used within the page content. Each of them has been specially crafted for Nayla and integrated into Elementor. With these widgets, you can create animations, define cursor interactions, and much more.
2 - Showcase Widgets
Showcase widgets are designed to easily add any showcase design you desire to your pages. Simply drag and drop the showcase you want onto your page. You can adjust all the settings you desire from the widget settings panel without needing to make any adjustments outside of the editor.
3 - Header Widgets
The specially crafted widgets designed for creating headers significantly streamline your work when designing headers. You can easily add your logos, menus, and other elements to your header at the size you desire and position them wherever you like.
PS: When customizing your headers, you can also utilize other page elements such as buttons, texts, and more.
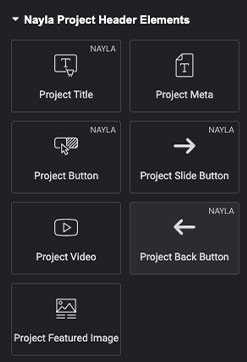
4 - Project Header Widgets
TThe widgets you can freely use to create project headers with Elementor can be found under this tab. Just like in headers, you can also use other page builder elements when creating project headers. However, it is recommended to use these widgets for dynamic content in projects, such as metadata, titles, categories, etc.
Just like creating inner pages, you can design project pages to your liking using Elementor. Before starting to create the project page content with Elementor, there are specific settings tailored for project pages. Let's take a look at these together.
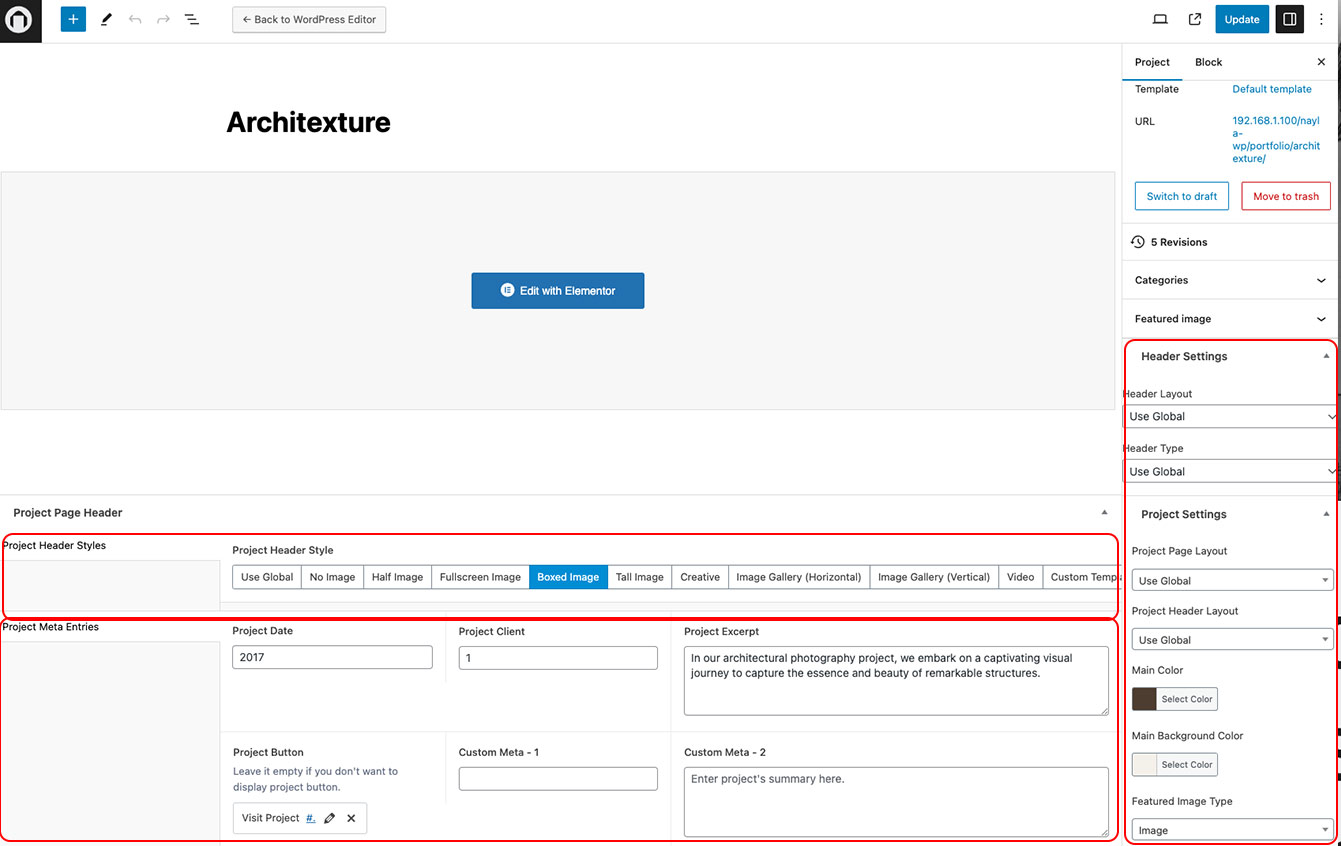
Project Header Styles: You can select a project header template (which are pre-designed for Nayla) for this project. If you set this setting to "Use Global" the global project header template which is comes from Theme Options sill be setted. You can also create custom templates and use here.
Project Meta Entries:You can define project metas here. This metas could be use showcases, single projects and project headers.
Header Settings:Same like the page options you can set header color set and behaivor for this project page.
Prpject Settings:You can define project page settings such as colors, featured images/videos etc. here.
After you set the settings in this page you can click on "Edit with Elementor" button and start building the inner project content same like the pages.
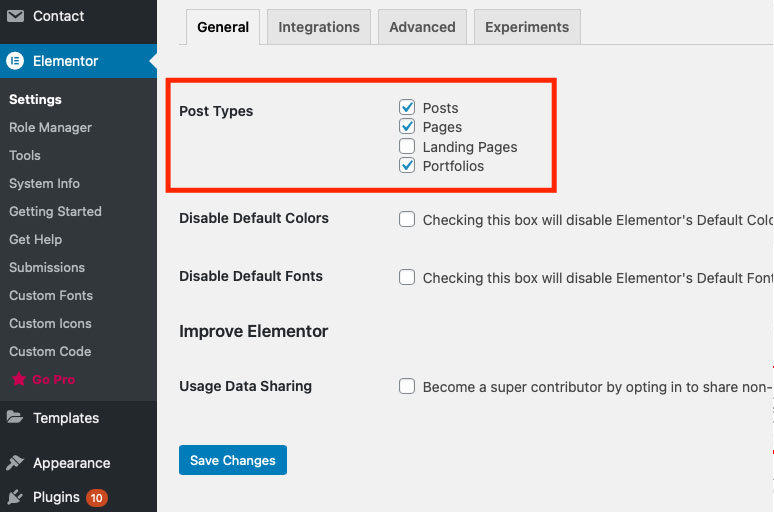
If you don't see the "Edit with Elementor" button here please follow these steps below;
1 - Navigate "Elementor > Settings" on your admin dashboard.
2 - You'll see "Post Types" section below "General" tab.
3 - Click on "Portfolio" and save changes.
When a new update is released, Envato will send you an email notifying you. Below are the steps you should take upon receiving such an email:
1- Go to your Envato profile and navigate to the 'Downloads' tab.
2- Download the latest version of Nayla.
3- The 'nayla.zip' file within the downloaded files is the latest updated theme file.
4- Replace your current theme file with the 'nayla.zip' file. (You can upload it directly in the WordPress panel just like installing a new theme.)
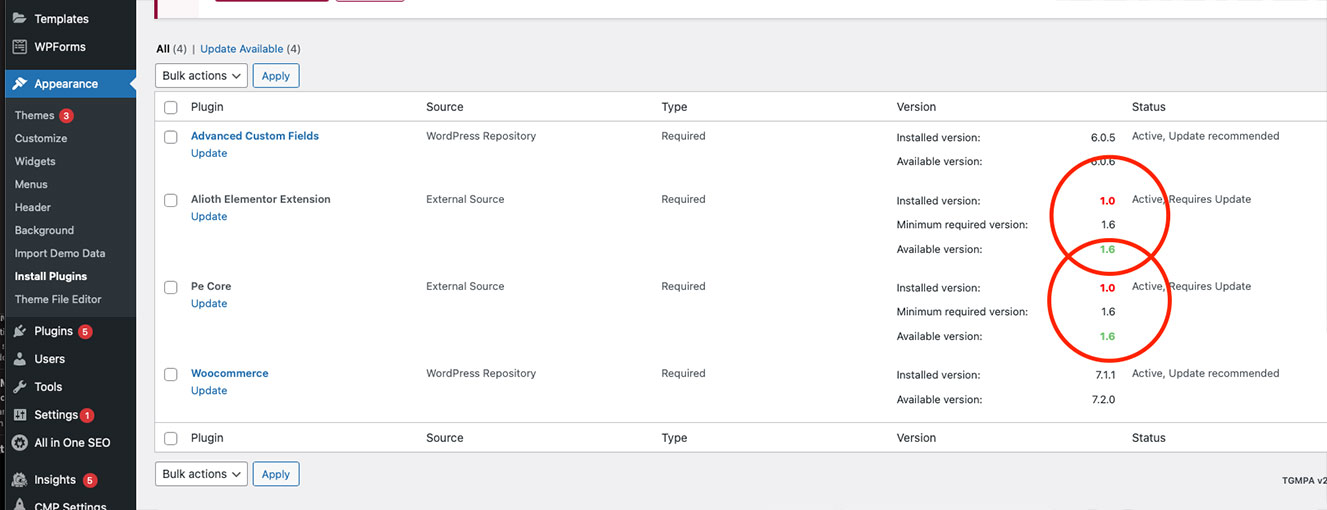
Often, when a new update is released, the core plugins of the theme also need to be updated.
After updating the theme, navigate to 'Appearance > Install Plugins' in your WordPress panel to check for updates to the core plugins. Don't forget to install them if a new version is available.
v1.5.0 [05.04.2024]
Elementor grid/flexbox containers compatibility added.
Custom fonts support added. (Theme Options > Styling)
Theme styling font sizes issue fixed.
Marquee desktop crash issue fixed.
Portfolio custom template selection bug fixed.
Font loading issue fixed.
WooCommerce template files updated to latest version.
Theme documentation minor updates.
Elementor/Elementor Pro "Gallery" widget AJAX compatibility issues fixed.
Text animations line-wrap issues fixed.
Responsive design adjustments.
Minor bug fixes.
v1.3.0 [15.09.2023]
IMPORTANT: Theme Activation Module has added, (Don’t forget to activate your copy after updating theme and plugins)
IMPORTANT: Project color settings readjusted (Don’t forget to set color for your projects)
NEW* Single Image (Elementor Widget) border-radius option.
NEW* Marquee image separator option.
NEW* Showcase 3D titles no infinite.
Theme Documentation updated (http://themes.pethemes.com/nayla/docs/)
Fullscreen carousel mobile view adjusted.
Layout switch bug for project pages fixed.
Layout switch page transtion issue fixed.
Images carousel spacing setting bug fixed.
Clients carousel drag & drop crash issue fixed.
Fullscreen menu visibility and animation issues fixed.
Template sub-menus height issues fixed.
Dynamic text for headings are adjusted.
Client logo change on layout switch settings added.
Demo content updated.
Responsive design adjustments.
Minor bug fixes.
v1.2 [15.09.2023]
*NEW - Project page template - boxed.
*NEW - Fullscreen slideshow autoplay enable/disable option.
*NEW - Removing line-breaks(‘br’ tags) on mobile devices option added for Text Wrapper
*NEW - Inner page projects (Single Project widget) -> project page transitions.
*NEW - Projects grid -> project page transitions.
Fullscreen Project responsive design adjusted.
Fullscreen Slideshow mobile slide navigation issue fixed. (Vertical touch move allowed.)
Elementor Editor crash when smooth scroll active issue fixed.
Sticky header smooth scroll issues fixed.
Fixed header smooth scroll issues fixed.
Smooth scroll page transition issues fixed.
Vertical image gallery project page spacing issue fixed.
Infinite tabs mobile title visibilition issues fixed.
Infinite grids motion blur effects are disabled on mobile devices (For animation performance improvements)
Lightbox gallery responsive issues fixed.
Project header videos autoplay issue fixed.
Minor bug fixes.
Responsive design adjustments.
Animation & speed performance improvements.
v1.1.2 [06.09.2023]
NEW FEATURE: Now you can create "Sub-Menus" with Elementor for classic navigations.
Demo content updated.
Showcase 3D titles, responsive view redesigned.
Infinite Grids responsive view redesigned.
Minor/major responsive design adjustments.
Minor bug fixes.
v1.1 [02.09.2023]
WooCommerce compatibility is up!
New* Home Page - Shop
New* Shop inner pages.
New* Shop Elementor widgets.
New* Blog posts page
New* Blog Elementor widgets.
Responsive design adjusments.
Minor Bug fixes.
v1.0
Release